Wednesday, 5 February 2014
Saturday, 18 January 2014
Design: The Relationship Between Points
Exercise Positioning a point
3 photographs
This exercise is experimenting with the different positions in which you can place a single point in the frame.
There are essentially three classes of position: in the middle, a little off-centre, and close to the edge. Placing a point in the centre very rarely works, because of the static nature it produces, although this is not a rule and you might justify it on the grounds of being unconventional. What was learnt about balance and proportion in Part one applies here.
There are two important relations, to do with movement and division. The sense of movement – a slight one – is created by drawing attention towards the point from thesides. The strength of this sense of movement is in proportion to the distance from
each side. The division is easier to see if you make a sketch of the position of the point, and then draw a line vertically and a line horizontally through this. The point implies a division, as in the exercise: Positioning the horizon. The idea of things being implied in composition is an important one, and you will see it at work throughout this part of the course.
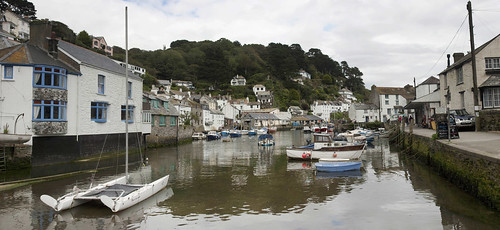
Exercise Multiple points
6 photographs
With several points the relationships are not so predictable. A group of objects implies
a network of lines, and can also create a shape – again by implication. In still-life
photography, one of the basic skills is to be able to group objects together in such a way
that they are linked attractively, in a relationship that is active rather than obvious and
static. This is essentially a problem of placing several points.
Set up your own still-life, with a background that is unfussy but not entirely plain. Use
between six to 10 similar-sized objects, each compact in shape. You should fix the camera
firmly in one position, aimed down at the background (ideally, use a tripod). The idea
is to control the composition by rearrangement, not by changing the framing with the
camera.
Begin by placing one object; make a record of this by taking a photograph. Then add
the second, then the third, and so on; each time, take one photograph. The aim is to
produce a final grouping, which is not so obvious as to be boring (avoid regular shapes),
but which hangs together visually. The process will take some time, if you give it proper
thought.
Consider each move and the effect that each new addition has on the overall grouping. You will almost certainly have to re-adjust objects that you have already placed, and may change your mind several times. This is perfectly normal in still-life photography.
When you have finished, you will have a blow-by-blow sequence of photographs that records your decisions. For the finalphotograph draw a sketch, indicating the ‘lines’ that relate the objects, and any basic shape or shapes that they form.
Saturday, 2 March 2013
Cropping Guide
First post for 2013 and I have stumbled on this image from a series of info-graphics on DigitalCamera.com

http://www.digitalcameraworld.com/2012/03/30/free-portrait-photography-cropping-guide/
It clearly shops the optimum crop limits for different portrait shots both landscape and portrait formats.
http://www.digitalcameraworld.com/2012/03/30/free-portrait-photography-cropping-guide/
It clearly shops the optimum crop limits for different portrait shots both landscape and portrait formats.
Friday, 28 September 2012
Positioning a Point
Elements of Design: Positioning a Point
To illustrate this the following images have been created with a single point as a focal point.
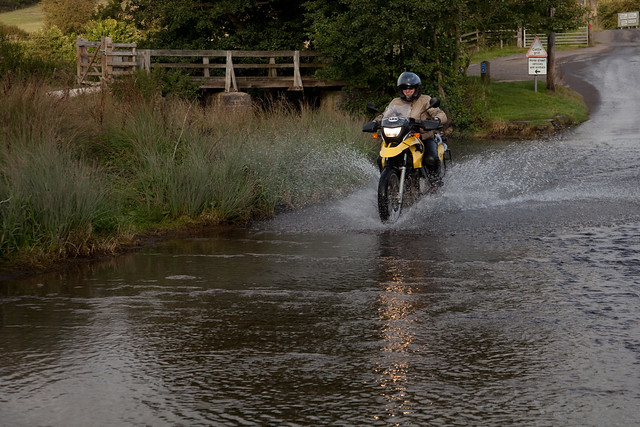
In this image the position chosen was to get the bike and rider into the top horizontal third slightly off centre with the reflected light leading the eye up the image. Also after an attempt at using blur to empahsie the water flow it was found that using a faster speed gave a sharper image and the increased feeling of motion by clearly showing the bow wave and hence the mechanical speed of the vehicle against the organic flow of the water.
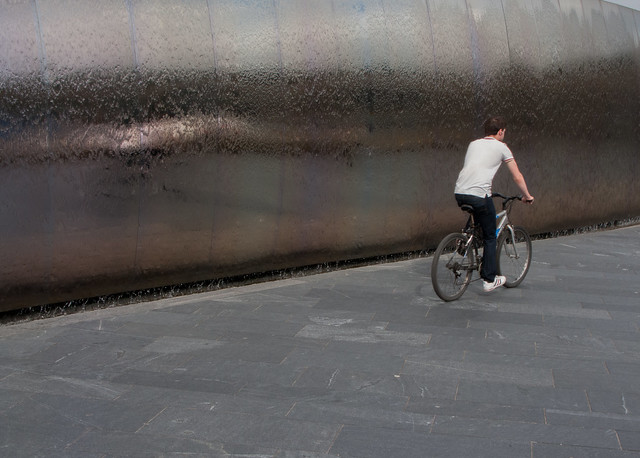
This subject again uses a fast shutter speed but in this case to keep the background clear. I wanted to emphasise the contrast between the colour of the shirt and the "softness" of the person on the bike against the "hardness" of the steel water wall and slate paving floor. Also by placing the subject in the right hand vertical third it gives another take on motion within an image.
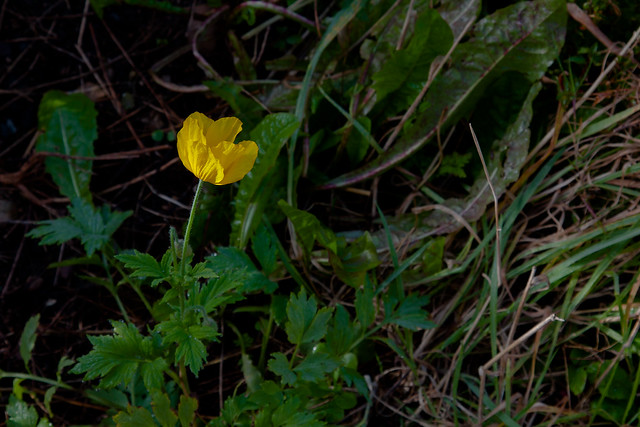
This image utilise the use of colour and texture to isolate the yellow poppy against the green of the other foliage. I used the first vertical third division to isolate and emphasise this against the green. I feel that by doing this you become aware of the subject then aware of the surroundings.
To illustrate this the following images have been created with a single point as a focal point.
In this image the position chosen was to get the bike and rider into the top horizontal third slightly off centre with the reflected light leading the eye up the image. Also after an attempt at using blur to empahsie the water flow it was found that using a faster speed gave a sharper image and the increased feeling of motion by clearly showing the bow wave and hence the mechanical speed of the vehicle against the organic flow of the water.
This subject again uses a fast shutter speed but in this case to keep the background clear. I wanted to emphasise the contrast between the colour of the shirt and the "softness" of the person on the bike against the "hardness" of the steel water wall and slate paving floor. Also by placing the subject in the right hand vertical third it gives another take on motion within an image.
This image utilise the use of colour and texture to isolate the yellow poppy against the green of the other foliage. I used the first vertical third division to isolate and emphasise this against the green. I feel that by doing this you become aware of the subject then aware of the surroundings.
Thursday, 27 September 2012
Points
Elements of Design: Points
To appreciate this element of design we need to examine the potential for a "focal point" or central point" of interest within an image.
The reason a focal point is important is that when you look at an image your eye will generally need a ‘resting place’ or something of interest to really hold it.
A focal point can be virtually anything ranging from a person, to a building, to a mountain, to a flower etc. Obviously the more interesting the focal point the better – but there are other things you can consider when using this including:
- Position – Place it in a prominent position – This ideally using the "rule of thirds" or the "golden section" to establish the correct position.
- Focus – Using "Depth of Field" to blur out other aspects in front or behind your focal point.
- Blur/Motion – Isolate the subject using shutter speed to blur the surroundings/background or alternatively capture the motion.
- Size – making your focal point large is not the only way to make it prominent – but it can help if it remains within context.
- Colour – using contrasting colours to isolate or seperate your point of interest apart from it’s surroundings.
- Shape – contrasting shapes and textures can make a subject stand out – especially patterns that are repeated around a subject.
- Context - or using the unusual. This can be accomplished by placing the subject in an unexpected setting or against a background that contrasts with the subject context.
Tuesday, 28 August 2012
Cropping and Extending
Cropping an image has already been covered in other exercises but to recap:
Cropping can be used to;
I decided to investigate extending the image by compiling a series of images to create a panorama.
Following on from the previous exercise I used the two formats to compile the images.First using landscape images , once aligned they need to be quite heavily cropped and some details are lost as the image is long and narrow.
When the images for the panorama are taken in the vertical or portrait format the resulting panorama is wider and easier to align with less need to crop the final image and less detail is lost.
In conclusion cropping can be use to "repair" an image but also can be used to create a new context or composition . Extending the image is also useful to create a larger format to ensure the subject is fully recorded when it far exceed the available mediums proportions. e.g. Landscapes or interiors
Cropping can be used to;
- Remove unwanted edge detail
- Restore balance
- Improve composition
- Change aspect ration or format
- Change context/meaning of image
I decided to investigate extending the image by compiling a series of images to create a panorama.
Following on from the previous exercise I used the two formats to compile the images.First using landscape images , once aligned they need to be quite heavily cropped and some details are lost as the image is long and narrow.
When the images for the panorama are taken in the vertical or portrait format the resulting panorama is wider and easier to align with less need to crop the final image and less detail is lost.
In conclusion cropping can be use to "repair" an image but also can be used to create a new context or composition . Extending the image is also useful to create a larger format to ensure the subject is fully recorded when it far exceed the available mediums proportions. e.g. Landscapes or interiors
Subscribe to:
Posts (Atom)