Friday 28 September 2012

Positioning a Point

Elements of Design: Positioning a Point

To illustrate this the following images have been created with a single point as a focal point.


Design: Point of Interest
In this image the position chosen was to get the bike and rider into the top horizontal third slightly off centre with the reflected light leading the eye up the image. Also after an attempt at using blur to empahsie the water flow it was found that using a faster speed gave a sharper image and the increased feeling of motion by clearly showing the bow wave and hence the mechanical speed of the vehicle against the organic flow of the water.


Design: Point of Interest
 This subject again uses a fast shutter speed but in this case to keep the background clear. I wanted to emphasise the contrast between the colour of the shirt and the "softness" of the person on the bike against the "hardness" of the steel water wall and slate paving floor. Also by placing the subject in the right hand vertical third it gives another  take on motion within an image.

Design: Point of Interest

This image utilise the use of colour and texture to isolate the yellow poppy against the green of the other foliage. I used the first vertical third division to isolate and emphasise this against the green. I feel that by doing this you become aware of the subject then aware of the surroundings.

Thursday 27 September 2012

Points

Elements of Design: Points

To appreciate this element of design we need to examine the potential for a "focal point" or central point" of interest within an image.

The reason a focal point is important is that when you look at an image your eye will generally need a ‘resting place’ or something of interest to really hold it.

A focal point can be virtually anything ranging from a person, to a building, to a mountain, to a flower etc. Obviously the more interesting the focal point the better – but there are other things you can consider when using this including:

  • Position – Place it in a prominent position –  This ideally using the "rule of thirds" or the "golden section" to establish the correct position.
  • Focus – Using "Depth of Field" to blur out other aspects in front or behind your focal point.
  • Blur/Motion – Isolate the subject using shutter speed to blur the surroundings/background or alternatively capture the motion.
  • Size – making your focal point large is not the only way to make it prominent – but it can help if it remains within context.
  • Colour – using contrasting colours to isolate or seperate your point of interest apart from it’s surroundings.
  • Shape – contrasting shapes and textures can make a subject stand out – especially patterns that are repeated around a subject.
  • Context -  or using the unusual. This can be accomplished by placing the subject in an unexpected setting or against a background that contrasts with the subject context.

Tuesday 28 August 2012

Cropping and Extending

Cropping an image has already been covered in other exercises but to recap:

Cropping can be used to;
  • Remove unwanted edge detail
  • Restore balance
  • Improve composition
  • Change aspect ration or format
  • Change context/meaning of image 
This last one ,particulary in journalism is often perceived as a legitimate tool. However how it is perceived by the intended audience is often in a negative way e.g  Reuters use of cropping being accused of bias

I decided to investigate extending the image by compiling a series of images to create a panorama.

Following on from the previous exercise I used the two formats to compile the images.First using landscape images , once aligned they need to be quite heavily cropped and some details  are lost as the image is long and narrow.

Cropping Panorama

When the images for the panorama are taken in the vertical or portrait format the resulting panorama is wider and easier to align with less need to crop the final image and less detail is lost.

Cropping Panorama 2

In conclusion cropping can be use to "repair" an image but also can be used to create a new context or composition . Extending the image is also useful to create a larger format to ensure the subject is fully recorded when it far exceed the available mediums proportions. e.g. Landscapes or interiors

Monday 30 July 2012

Vertical and Horizontal Frames

This exercise is to encourage the use of a portrait(vertical) frame vs. a horizontal (landscape) frame which given the shape of the standard SLR viewfinder is the most "natural" orienation to use.

To do this the requirement was to take 20 images each with a vertical and horizontal shot. Below is a slide show of the 20 examples I have taken.


Also besides the obvious use of the vertical orientation for tall objects and standing people I also have considered the following when choosing the subjects above;
  • The subject is already vertical
  • Height needs defining
  • Motion of the subject is vertical
  • Defining direction of subject gaze - up or down
  • Directing the viewers gaze within the image
  • In portraits it can be used to retain tighter control of basic composition rules e.g. the rule of thirds
  • Isolate a feature of the subject
  • Defining the position/boundary of an object within it's containing space.

Sunday 29 July 2012

Positioning the Horizon

Horizon - This exercise is to explore different positions of the horizon and and how they affect an image.


Horizon 2

Placing the horizon line at the top of the image purely draws attention to fore ground and near distance subjects. It heavily depends on foreground interest to give impact. I also find it contains the image within a defined boundary.

Balance

Balance in the image - taking six photographs from previous exercises I re-examined how the balance works in each one.

As per the course notes it is easier to see how the balance and elements that make it up appear within the shot.

TAOP - Balance

As can be seen in the shot above, the main element of the main object is in the middle with two lesser elements "weighting" the edges of the image. This works as the main object is filling the frame and is symmetrical. This balance works best with objects like this.

Sunday 1 July 2012

Focal Lengths and Different Viewpoints

This exercise was to compare the effects of how your physical viewpoint needs to change when shooting with different lenses.

Using a 105mm lens , the focal length at the extreme of my zoom lens, I took this first picture.

ViewPoint (1 of 2)

Friday 29 June 2012

Balance

In this exercise the instruction is to examine six previously taken images and decide how the balance works in each one.

I haven't exactly conformed to the letter on this one as one of the images is crop taken as part of another exercise , but it does have relevance.

Saturday 16 June 2012

A Sequence of Composition Take 2

Taking the exercise one step further I saw a fairly unique custom built machine on display and moved in using the viewfinder.

sequence2 (1 of 23)

First I went in close but felt it was not showing the machine in the best way...

Friday 15 June 2012

A Sequence of Composition

The object of this exercise is to try and use the viewfinder to compose the shot... not wait for it but try to find the ideal shot and record the process. By shooting the nearly moments it is hoped to see the process as it develops.I started this sequence with around 25 shots and I edited down to the 18 you see here. I decided the ones with arms and legs obscuring the shot didn't really count...

The sequence started with a crowd gathering to see a rare Indian motorcycle being started at a classic motorcycle open day...

sequence (1 of 18)

I changed angle to try and get more shots of the faces of the crowd as the anticipation of hearing it run started to build

sequence (2 of 18)


Sunday 10 June 2012

Fitting the Frame to the Subject

The object of this exercise is to see how you can use the viewfinder to frame a subject.


The camera I used for this exercise has a 98% coverage viewfinder which I found interesting to see how it would change what I saw against what was produced.

Also the advise about tilting the camera missed out some another pertinent fact, some times you need to tilt yourself to get the shot. Even simply moving sideways changes what is in the viewfinder and what can be included in the image as it unfolds before you. Or in my case lying down and tilting me and the camera!

First image is just taken, without any concious effort, just a snapshot of the object as you first see it.

TAOP_Fitting_frame (1 of 4)

Sunday 22 April 2012

Focal Lengths

For this exercise I took six pictures at different focal lengths of the same subject. While the central subjects of the images stayed the same there was a distinct shift in peripheral details as well as the depth of field of the central part of the image.

I find that the boats in the image taken at 105mm become the main subject but in the one taken at 24mm the overall landscape is the main subject. This continues until we get to the last shot at a "normal" angle of view (70mm) then after that the central object appears flatter in relation to the background and more isolated.


TAOP - Focal Length - 24mm
Focal Length - 24mm
TAOP - Focal Length - 28mm
Focal Length - 28mm
TAOP - Focal Length - 35mm
Focal Length - 35mm
TAOP - Focal Length - 50mm
Focal Length - 50mm
TAOP - Focal Length - 70mm
Focal Length - 70mm
TAOP - Focal Length - 105mm
Focal Length - 105mm

Friday 20 April 2012

Object in Different Positions in the Frame

This is an exercise to study how an object fits it's position in the frame taking a an object against a plain background you can , by positioning it in within the frame change its dynamics.


Taking a shot right in the centre of the frame has no real dynamic input it merely shows this is the object.

TAoP _ Position in Frame

Moving the main subject slightly to one side starts to add a more dynamic feel , making you look at it is as well as the background.

TAoP _ Position in Frame

Moving it again to the top right corner of the frame adds another element as the eye moves up the image.

TAoP _ Position in Frame

Moving it down adds another not so dynamic experience

TAoP _ Position in Frame

Positioning of an element centrally has the effect of neither the background or the subject having a distinct priority. The attention flicks between the subject and the background. Moving the subject off centre actually makes you start to look at it more. However depending on the position as the image is "read" can also affect this. I think moving to the right either to the edge or either corner draws the attention where as on the left we still get the same effect of the "flip flop" between subject and background.

Wednesday 18 April 2012

Sunday 25 March 2012

Shutter Speeds:Summary

As regards my favourite prints from the two exercises I have chosen number 8 from the Shutter Speeds exercise  I like the feel of the blurred movement combines with the sharper elements. I like the combination as it gives a feeling of speed and the disturbance of the water. Not totally a smooth extended exposure of water , as is often done with the sea and waterfalls, but a way of implying the force as well as the speed of the water.

Shutter Speeds - 8

However I prefer the sharper elements of image number 6 of the Panning series,the car being sharper and the blurred background and wheels give a better feeling of the motion. Not really speed, but the fact it is a moving car and not a static object. The kind of combination that would be ideals for photographing motor sport, particularly on a bend so the vehicle can be followed through and captured on the apex and the follow throgh allows the photographer to follow a natural curved movement. Which is a lot easier then trying to capture the image going directly across the field of view

TAOP - Shutter Speeds Panning - 6


Shutter Speeds Panning

This exercise is to see the effect of following movement as it moves across the focal plane of the sensor/film.

Following the motion with the subject as near to the centre of the fame as possible, before firing the shutter (panning) I tried to stay as close as possible the same combinations of speed and aperture I did in the previous exercise.

I tried to choose moving subjects at roughly the same speed for the following images:

Shutter Speeds Panning - 1

TAOP - Shutter Speeds Panning - 1
Exposure 1/3200 sec
Aperture f/4.0
All movement has been frozen which almost make the car look static, no real feeling of speed or any movement.

Shutter Speeds Panning - 2

TAOP - Shutter Speeds Panning - 2
Exposure 0.001 sec (1/1600)
Aperture f/4.0

A combination of frozen movement and the narrow depth of field required to give the fast speed to take this shot still don't combine to give any indication of speed or movement.

Friday 9 March 2012

Elliot Erwitt - Sequentially Yours

From the BBC
"
The book Sequentially Yours collects a series of vignettes by legendary photographer Elliott Erwitt.
Each photo is taken just moments apart with the sequence telling a story that is surprising, moving or simply funny.
The Paris-born photographer, whose Russian-Jewish family emigrated to the US in the late 1930s, got the idea when he was looking through the contact sheets of all his work.
He realised that "sometimes a story is better told by more pictures rather than one".
The short stories about life and lovers, pets and children were shot all over the world during the past 60 years.
In his studio and apartment facing New York's Central Park Erwitt told the BBC how patience is the key to getting a good sequence of photographs.

Produced by Anna Bressanin, Camera by Ilya Shnitser"


http://www.bbc.co.uk/news/magazine-17295728

Powered by ScribeFire.

Monday 6 February 2012

Shutter Speeds

The object of this exercise is to take a series of photographs of a scene or a person involving movement.

Movement needs to move across the field of view, while the camera is in a fixed position.

It requires a series of exposures that starts with the fastest shutter speed to the slowest possible exposure.

The notes do say to go as low as one or two seconds, but unfortunately I couldn't go as slow as that with my chosen subject. Also there was a need to keep the aperture similar to the range used for the exercise using different apertures in this case with the lens I was using it ranged from f4.0 to f22.

I noted that Image 6: at a speed of 1/160 and f4.0  is the last point at which clearly defined movement can be seen and the following images all start to develop blurring with an equivalent loss of detail until Image 12, where the lack of details starts to become a distinct feature.

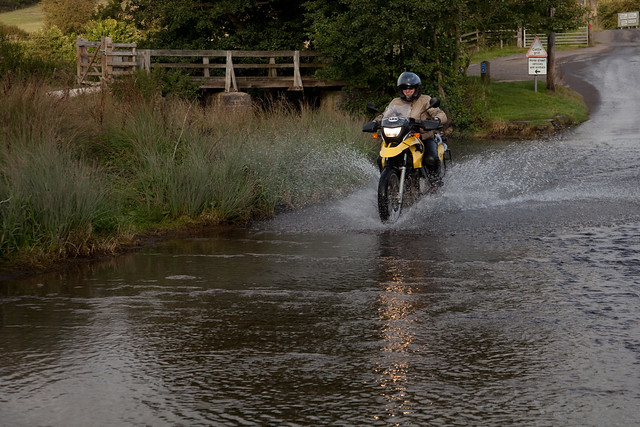
Image 1:1/2000 sec at f/4.0
All speeds of the water in movement have been captured here , even down to the distinct droplets of water flying up as the water breaks over the weir. The feeling of the speed of the flow is accurately recorded with a lot of clarity. I personally find this to be a quite clinical and sterile image which "records" a frozen point in time.
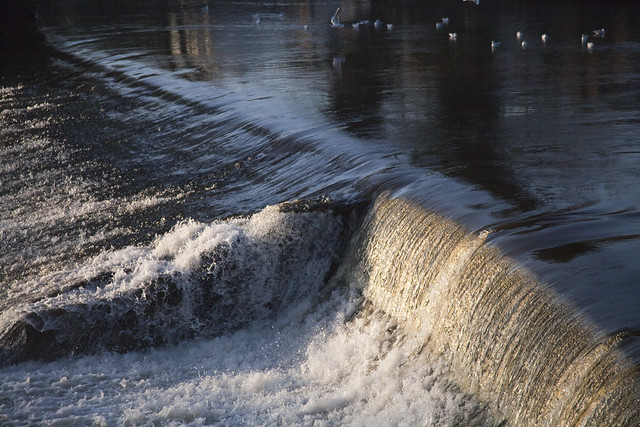
Shutter Speeds - 1

Image 2:1/1600 sec at f/4.0
As in Image 1: movement has been captured but there is also a lot more detail in the shadow areas as more exposure has taken place.
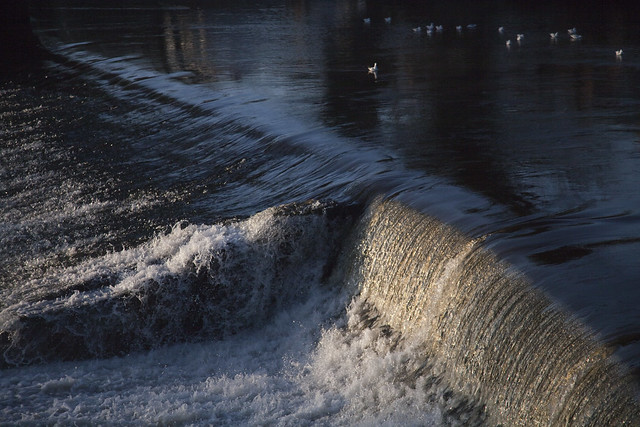
Shutter Speeds - 2
 
Image 3:1/800 sec at f/4.0
As above there is still distinct details but now the highlight areas do not appear retain as much and what were distinct small individual droplets appear to be merging into larger ones.

Shutter Speeds - 3

Image 4:1/640 sec at f/4.0
Detail in highlights and shadows is not as distinct, but there is still clear distinction between moving and none moving water.
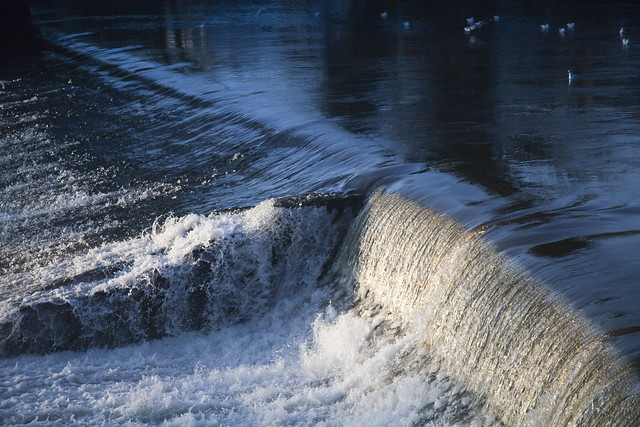
Shutter Speeds - 4

Image 5:1/320 sec at f/4.0
 Less distinct than the previous 4 images but the faster movement can still be clearly seen, but some shadow detail is tarting to merge.

Shutter Speeds - 5


Image 6:1/160sec at f/4.0
This appears to be just retaining the last of the detail in highlight and shadow areas. Overall exposure and details is good and clear with out being as "sterile" as Image 1:. Less of a feeling of simply recording the event.
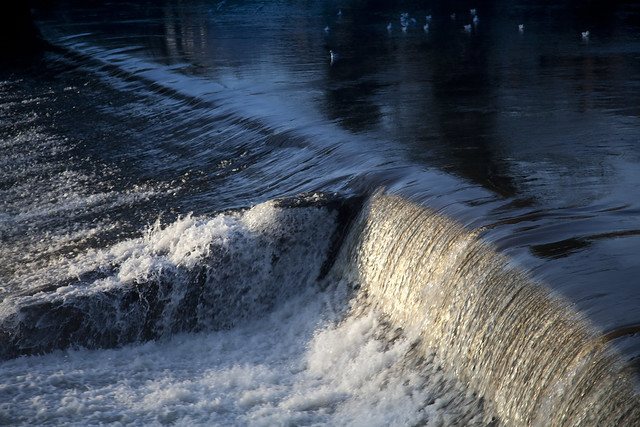
Shutter Speeds - 6

Image 7:1/80 sec at f/5.6
Slightly more detail in general with the improvement in depth of field, but the start of distinct blurring in the highlight/faster moving areas.

Shutter Speeds - 7

Image 8:1/40 sec at f/8.0
Yet again another increase in depth of filed, but the blurring is now very clear in highlight and shadow areas. there is still some detail in the slower moving water but in general there is not a great deal of detail in any moving area.

Shutter Speeds - 8
Image 9:1/20 sec at f/11
There is very distinct blurring of the highlight/faster areas with some of the shadow/slower areas starting to take on a more "sculptural" quality.
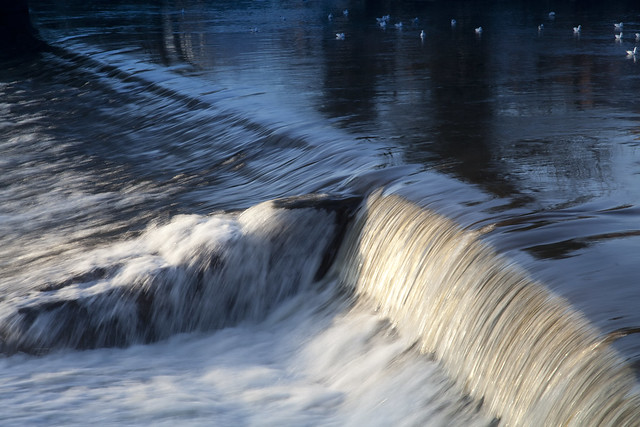
Shutter Speeds - 9

Image 10:1/13 sec at f/14
We are starting to lose all detail in slower/shadow area now and the effect is starting to become very pleasing in a the movement becomes blurred and carries more of a suggestion of speed rather than a true representation of it.

Shutter Speeds - 10

Image 11:1/8 sec at f/18
Even with the increased depth of field detail is now almost lost as the sensor overlays all the information from the higlight/faster and shadow/slower moving water. The blurring creates even more of a suggestion of movement and creates an interesting effect.

Shutter Speeds - 11

Sunday 22 January 2012

Stucture helps creativity... ?

I have been struggling quite a bit with this course, creatively that is - techniques and basic knowledge are not the problem. Not only have I also had the issue of an increased workload due to staffing problems eating away at my free time, photographically awful weather,malfunctioning and just plain broken hardware and the other less savoury vagaries of life keeps getting in the way... but worst of all has been my approach to the whole "study" element.

I have spent a lot of years accumulating photographic knowledge and techniques, initially from books and magazines , working with and talking with other photographers, studying other peoples work in books and at exhibitions and in latter years internet sites. Totally unstructured and apart from taking and passing an A level course in the 90's , I have just been free to do it my way. All of a sudden following the course structure started causing me problems... I normally jump around doing things by how it feels best. Following the course structure  I have had to stop and reconsider and in some case try to "forget". It's been hard.

It has been feeling to me that it was stifling my creativity... as in I have been struggling to shoot images, when I would normally know what instinctively to shoot. I am having to stop and consider... which wasn't working at first but now it is!  Considering what I am going to shoot, and how I am going to do it is becoming easier and not causing me as many issues as it was at the start. I can now slow myself and follow the exercises without leaping ahead in my usual "grasshopper on a sunny day approach"; no longer leaping from aspect to aspect of a shoot without considering the direction.

Is this all for the good ? Or is it something to learn then unlearn in the future?


Powered by ScribeFire.